Monday, August 11, 2014

Making a Primavera Part 2: Icy Resin Coat

While waiting for my art metal clay to arrive I was thinking two things
  1. that if I do get the art metal clay to work, it'll be REALLY expensive to do per clip.  Roughly, I think I'll need 20g of silver metal clay per clip, which is $60 + shipping on top of a $44 clip.  So that's already clearing $100 in materials, to say nothing of time, consumables and whatever else that'll entail.  And that's assuming it works at all
  2. I was really antsy to try out my new mold.
When I coat the the other Ficcares I make I use a compouned called Ice Resin.  It takes 8-13 hours to set and 3 days to cure.  It's a pain to work with, but dries crystal-clear, hard, and doesn't yellow.   I wondered, since metal clay will shrink when I fire it, if perhaps I could make an Ice Resin topper that I could then epoxy down / paint silver (not sure which order is best yet). 

So while I was working on a bunch of custom orders on Saturday I mixed up some Ice Resin and loaded it into the mold.  Because it takes so flipping long to set I had to keep tilting the mold back and forth to distrbute the resin as it set up.  Thankfully the longer this went on the thicker it got, and the less I had to tip. 

But here we were:


It was very thin and I took it out carefully, mostly worried I'd ruined the mold that had taken so long to make.

 
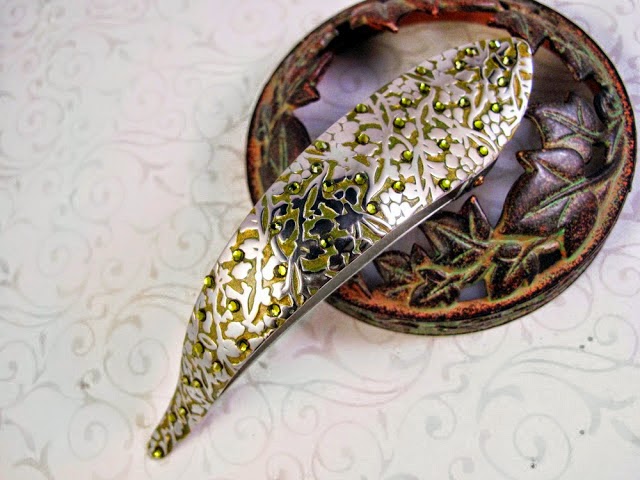
And then set it atop a blank clip I had to finish curing.


It still needs to finish the curing process, but it's hardening up nicely.  Then I can clean up the edges and see what there is to see.  As it stands, though, I do think it's pretty this way.  It has a frosted glass look to it that I think has a unique amount of depth to it.
 
I'm not sure about the best way to paint it silver and then secure it down on a clip.  An antiqued/colored look might be best because I think I'm going to lose the textured recesses with a bit of primer and paint.  But we'll see.
 
In any event, this is shaping up to be a much more cost-reasonable approach than the silver art clay, and at least let me prove to myself that my mold works as desired!

Friday, August 8, 2014

Making a Primavera Ficcare Part 1: Making the Mold

The Primavera collection from Ficcare is my long-standing favorite.  I'm lucky enough to have a few, three, specifically, one silver, one silver where I blackened the recesses, and one silver that I gave an olivine enamel and crystal treatment to:

 
Sadly, they stopped making these clips years ago and they're very hard to come by.  So I wondered, could I make a Primavera top that I could rivet down atop a blank matte Ficcare, thereby giving it a Primavera finish?
 
Here's my plan:
    • Make a mold of a Primavera
    • Use art Metal Clay to create the patterned top
    • Rivet the metal patterned top down on a blank clip

I have no idea if this will work, but can't hurt to try, right? :) 
 

Making a Mold

The first step was to make a mold.  To do this I had to take a reverse-casting of an existing clip.  After a bit of research I settled on a composite mold compound.  The short version is that you melt it down, cast something and then can use that to make replicas.  You can watch a video of how it works here.


It was a little unnerving knowing I was going to pour hot resin over a fairly valuable hair clip, so I did my best to protect it.  Using a plastic bag over the lower jaw and taped to the underside of the top of the clip, I was at the very least hoping to keep the goo out of the hinge.


So I had the Ficcare, had the ComposiMold, and then I needed to find a vessel to cast in. I wound up using a craft organizer with one section walled off by a box of toothpics wrapped in a plastic baggie.  This allowed me to set a small size that would enable me to pour the entire clip rather than trying to figure out how to do just the top.  Both the top of the clip and the inside of the casting box were given a mist with mold-release.
 
 
I don't have pictures of me pouring, because I needed to hands to do it, but here it is with liquid resin all over it.  At this point I was REALLY hoping I hadn't ruined the clip.


It wanted to turn over like a fish, so I taped down some sticks to help keep it pushed down in the mold, then went back to my day job and hoped I wouldn't come home to a total mess.


After returning, I carefully eased the block out of its casting box, and lo! It seemed to have taken well.   I also felt the need to make a Jurassic Park joke :P


And then I very, very carefully started extracting the clip from the block.  I had to be careful not to cut the patterned bit I wanted, scratch the clip, or slip and cut myself.  It took over an hour just to cut everthing away.  Thankfully I have very steady hands, prompting my high school biology teacher to say during dissections that I should have been a surgeon.  


AHHH.  So much for that not getting it in the hinge plan!
 
 
Thankfully after several minutes I was able to get it all out.
 
But it worked!  I was able to get the clip out totally unharmed AND had a pattened mold with with to try making a metal clay cast from. 


I've got a fire brick and more clay on the way, so stay tuned for making the metal plate.


Thursday, August 7, 2014

First Honey Harvest

This past weekend we had another adventure into the hives. They were getting towards the back, so we had to go in and see what was going on and possibly remove a few comb.

The good news is that with our past adjustments the pine hive never did swarm and seems to have settled in to make honey. So DH and I suited up and headed up to the apiaries. 

We started with the pine hive and worked from the back forward. We have a tub that we set the top bars in as we're working. Turns out that the pine hive was already building on the last top bar. This is the comb they were working on, filled with dehydrating nectar:


Here's another few comb, the foremost one is honeycomb at the top (that's capped honey), then empty comb at the bottom and a small patch of brood comb at the lower left:


And a whole bunch of top bars:

 
We decided on two comb to remove from the cedar hive, one that was build all wonky and a second that was mostly empty brood comb. That was we could encourage a smaller brood nest and give them more room to build up their honeycomb stores for winter. Then we went into the cedar hive. This hive had no wonky comb, except the front one, which we left. I have no idea what the hell they're doing, but I was feeling like it was going to be a mess just trying to get that one out XD The biggest concern with wonky comb is that they'll keep that same pattern for the rest of them, but since the comb following was fine we weren't worried.
 
Here are the comb we decided to remove.  They had honey comb at the top, which we'd already broken off:
 
After everything was put away we were able to appreciate our spoils:


And then it was into the house for processing! Here's our honeycomb. The weight on the scale is including the bowl. Once I melted down the wax, weighed that, and then weighed the bowl I figured out we got about 4.5 pounds of honey. That's way more than I expected from just taking out three junk comb!
 
 
We really didn't have enough to justify using our big straining buckets, but I wanted to try anyway. There's two buckets, and the top filters into the bottom one with the valve. 
 
 
I started by loading the comb into the top bucket, which has a punched metal floor and then a mesh bag for filtering:
 
 
And then squished it up with the potato masher:
 
And this is all we had. it didn't even come up to the bottom of the valve:


But in practice it turned out to be quite a lot! I kept some capped honecomb (because I love eating it), but here's the rest all bottled up. We had a side of cranberry and quinoa with dinner and drizzled honey on the top. It was *amazing*.


A small jar and some circular comb going off to my best friend:


All the same honey, just different thicnkesses/amounts so the smaller jar appears more golden and the most full jar the darkest.

Safe to say, this is SUCH a fun hobby. It's much more fun and much cooler than I ever expected, stings and all.